Orange shaped Triangle
January 3, 2013
‘Another year, another day’ is usually the saying that I go by to start off my first official work day back into the so called ‘daily grind’ of life. Nine out of ten times, I’d agree with that saying but this year seems like it’s going to be a different year. Unfortunately, 2012 didn’t really seem to end on a high with all the tragedies happening around us. It was heartbreaking just reading about all these horrible things that was happening in our society. But, we are human beings and we do tend to pick ourselves up when faced with adversity. The way 2012 ended for me as a whole was on a positive note. I was busy as hell during the Christmas rush period that the jewelry industry faces around the months of November and December. Yes, it isn’t what it used to be in terms of volume of work that used to show up on my doorsteps but, times have changed and would you look at that, I’m writing a blog to share my work and help people understand the labor side of my industry. Before I get into my first blog of 2013, my heart goes out to those who lost their lives and the family and friends that were affected with these horrible tragedies.
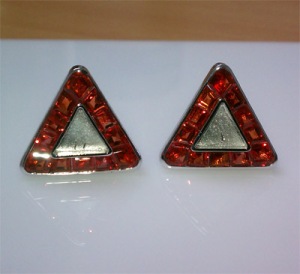
Now on to the business end of my blog. Orange shaped Triangle? I know my blog titles are sometimes tacky but they do tend to blend in with the subject that I’m writing about. So I get this job order to make some custom made cufflinks, in 14 karat, white gold. Simple right? Not really because the customer wants me to supply and cut orange sapphires, set in a channel setting with black mother of pearl cut into the bezel which sits in the middle of these cufflinks. It sounds so simple and standard but for some reason, jobs like this always ends up on my doorsteps. If anyone knows anything about how hard it is to find baguette shaped orange sapphires, they should know how difficult this job really is. There is no such thing as baguette shaped, orange sapphires because there isn’t a demand for it so none of my suppliers would have these stones, sitting around,collecting dust. My next option would be to find oval shapes sapphires large enough to cut down to the size I need. Seems simple, right? No, it isn’t simple. You need enough pieces, which in my case, 30 pieces that match in color and size. The size that I need are 6x4mm oval shapes which then, I need to cut down to some special cuts which involve tapered cuts and what not. Okay, so oval shaped, 6x4mm orange sapphires seems easy enough right? First of all, to find 30 pieces that match in color is going to be a difficult task. This requires me to find a few suppliers that carry orange sapphires.
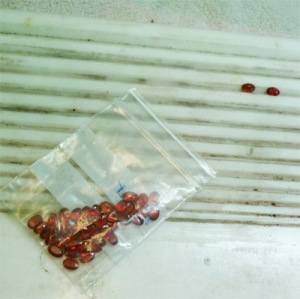
Fast forward the boring and annoying parts and I went through three suppliers and I found myself 32 matching 6x4mm oval shaped stones.
So here comes the fun part. Mapping out how I’m going to cut these sapphires. There are three corners in a triangle, obviously, but for those who didn’t know, you’re welcome and you can thank me later for your geometry lesson for today. I tried cutting a large diamond shape for each corner and it looked ugly so my next step was to cut that diamond shape that I originally thought would work, in half. So each corner would need 2 stones, sitting flush, next to each other, supported by the bezel walls.
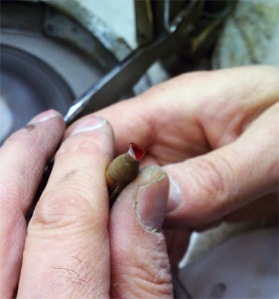
Here you got my pops cutting the sapphires to the sizes that I need.

He’s changing out the wheel so he can start polishing each facet he put on the orange sapphires.
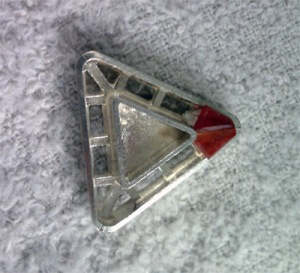
As you can see here that having a large stone on each corner would make it look so bulky so cutting the sapphires in half just made it look so much better.

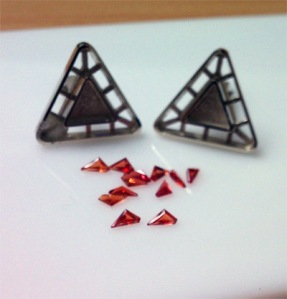
My customer approved on how we were going to cut the sapphires for all three corners because frankly, it looked ten times better. After I got the okay, my father started the process of cutting the other 10 stones for each corner of the cufflink pairs.

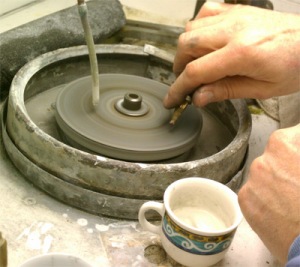
After cutting the sizes needed for the corners, my pops polished the sapphires. The next step is where your setter comes into play. This is the part where you pray that you have a good setter that knows how to work and set colored stones so he doesn’t end up breaking the stones. This isn’t your ordinary channel setting so it’s vital your setter is a seasoned veteran when it comes difficult jobs like this.
‘On the money’, so far, with the setting job. You start to get excited when your job is starting to come to life. The next process is cutting six pieces for each cufflink, so twelve total for the pair, of baguettes. tapered cut on one side only to sit flush with the corner sapphires. That should leave you with the middle section open where a straight baguette should sit, which is 6 total for the pair of cufflinks. This is the part where I fast forward the setting process and just show you the finished product.
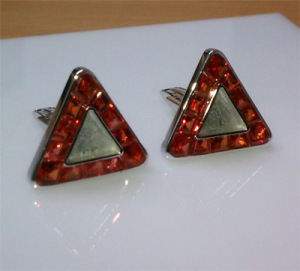
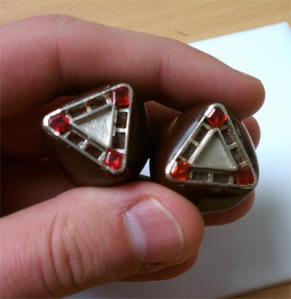
Amazing. ‘On the money’ job by my setter again. So for the final part of this special order, I supplied and cut some black mother of pearl for the middle bezel section but I did not glue it just yet. I had my jeweler polish and rhodium the cufflinks so that all I had to do was just glue the mother of pearl into the bezel. Fun fact of the day, rhodium ruins mother of pearl.
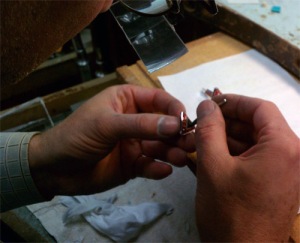
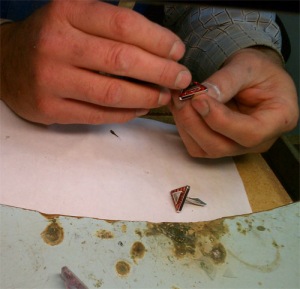
Here’s my dad gluing the black mother of pearl into the cufflink.

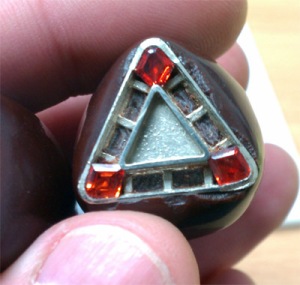
Beautiful. I mean, it’s not something that I would wear personally but the amount of time and effort and the years of experience and skill that takes to complete a special order job like this to perfection, isn’t always appreciated. My customer loved the cufflinks and that’s all that matters.
On that note, I want to wish you all a successful and happy 2013 and hell, the Mayans were wrong, the world didn’t end and I’m thankful for that. Till next time…
35 gram Emperor
November 13, 2012
Here are back to back blogs just to make up for the silent treatment I’ve been giving you guys. My Instagram blog was just to promote myself on the photo sharing application. Self plugs on my own blog is always acceptable. Anyway, this blog is a good one. I’m going to share my experience making this custom men’s ring that I made from scratch.
I get an email from one of my customers saying they need a size 11 men’s ring, custom made. So we get to talking and I ask for some ideas he had in mind. He first sent me an image of this Lapis rough that he’s had in his possession for many years.

He wanted me to build a ring around this piece of rough. I asked him to send me some ideas he had in mind for the ring. He starts to send me some images and I started to get an idea of what he wanted. Most of his images that I received looked like this ring was supposed to be heavy. I received some more images of some filigree style designs you’d find on antique picture frames. So, in my head, I was like ‘Ok, this seems like a project that I’m going to enjoy’.


Jobs like this are fun because it’s on the jeweler to design freely without sacrificing the attention to detail that certain projects, like this particular ring requires. So I pull out my piece of paper and dust off the art supplies and I start to design. A little back story on how I became a so called ‘artist’. When I was a kid, my mother used to drag me to work whenever I was off from school and in order to keep myself busy, I’d animate. I was heavily involved with comics and that inspired me to duplicate drawings of Spiderman and classic characters like that. Anyway, so this is what I originally came up with as a draft for this ring.


Here’s some close up shots of the ring. I gave my client a birds eye view and a 3D view of how the ring would look like.
He loved it for the most part but he wanted to remove some filigree twirls and add some sort of pattern on each corner of the ring. He also wanted the filigree to act like a setting and just sit on the stone. So I started to design an altered version of my original sketch.

Like I said, a rough sketch. He loved the little winged sections on each corner and how I incorporated each little section to act like a ‘prong’ or a bezel so this stone could sit nice and tight.
After he approved it, I started the process of bringing this piece to life. So I started the CAD process. ‘CAD’ stands for ‘computer-aided design’. This style of designing a wax with the aid of a computer came into the business about 10 years ago. It’s more accurate and spot on with the angles. Anyone can CAD but some people that CAD, don’t really understand the jewelry side to things. You need to know why the section needs to be there versus just drawing something. You need to understand the math behind it before getting into the CAD business.

It’s such a trip seeing your drawing come together like this, in CAD form. I went with a woven look to give some life to the shank. The customer loved my idea since I started incorporating it into my sketches.
My customer loved the CAD and approved it. So my next step is to send this CAD file to the wax printing machine. These machines will grow the wax from the ground up. It lays down the foundation and starts to grow your file, layer by layer. This ring took about 23 hours to grow.


So you got the bezel with all the filigree work on the left, the gallery in the middle, and the ring itself, on the right, all ready to be casted.
I made the bezel separate in order to fit the large Lapis, that I’m going cut, into the ring without damaging the stone itself. The stone has a few natural inclusions (cracks). It’s not recommended to set into a bezel setting when you are dealing with a fragile stone.
I showed the customer the wax that I grew, just to get him excited before I sent it to casting. He loved it and gave me the ‘OK’ to cast it in 18 karat, yellow gold.

The casting came out beautiful. But before I do any work on this, I’ll need to cut that Lapis rough into a cushion cut with a high dome and a checkboard cut.

I started the process of shaping the Lapis into the Bezel.


This is the final, ‘attention to detail’ portion where I’m getting the stone down to the millimeter in order to have it fit perfectly into the bezel.


After sizing the stone into a cushion cut and shaping the domed section, I started to process of adding facets to the Lapis. This is the finished look that I had envisioned in my head when I first thought about how the stone would look like on this ring.


After doing some gold work and adding the polish and finish to this ring, I was impressed how this 35 gram, 18 karat monster of a ring, came out. It sort of looks like a ring that would of belonged to an Emperor or some sort of royalty. The woven design on the shank adds flavor to the big filigree work on the bezel. This was a fun project I must say. The customer was pleased with the results and he almost cried when he saw it. It brings joy to my heart, knowing that work like this is still appreciated.
If you have any custom ideas that you’d like to bring to life, email me at Sako@cicadajewelrydesign.com but other then that, till next time…
Armored Innovation
November 16, 2011
This post was supposed to be up 2 weeks ago but I’ve been lagging it. I don’t buy into the whole notion of saying ‘I don’t have time’, because you can always make time for anything you put your mind to. I either fire my secretary, which I don’t have, or I learn how to schedule myself better. Anyway, I always love coming up with different cuts that’s not in the norm. They’re usually special cuts to inspire that designer in us all. Shapes that you won’t find in the market because there isn’t a demand for that shape. Well, I was inspired to come up with this new cut that looks like a shield so I named it a shield cut because me being the artist/designer, I have to exercise my artistic freedom. If you have a vision I can shape your creation so feel free to ask me or send me your requests. Ok, enough selling myself, time for the good stuff.
First off, I’m a fan of Amethyst. One, it provides me with a wide range of that purple hue color that I’m a fan of. Two, It’s affordable and I have a that freedom of trial and error without killing my pockets. You can waste a lot of money if you’re not trained when mapping out where and how to cut your piece of rough so take your time and map out the steps when dealing with the cutting process.

So here’s my piece of rough I chose. This particular Amethyst is a ‘rose de france’ amethyst. The color is reminiscent of a lavender lilac shade which is a lighter color that usually comes from the Amethyst family.

This is the process of slicing. I need to slice this piece of rough in order to get my desired section I choose to preform the stone out of.

This diamond grade disk is spinning at a high RPM. Water is needed to cool off the friction this process causes.

Take your time when pushing the piece of rough through the disk. You don’t want to break the stone and don’t want to lose a finger in the process so be cautious if you ever decide to slice.


So I sliced through the rough and notice how clean it came out.


I displayed the two pieces of sliced Amethysts for an up-close, personal view so you can to check out the aftermath of the slicing process.
After the slicing process, I started to preform the Amethyst. I started the process by hand until I got the desired shape I’ve been looking for. I then transferred the stone to my dop stick (check out one of my older blogs by clicking on the link to get the terminology, I.E. ‘doping stick’ by clicking here.) for a more controlled and measured feel to the shape I was aiming for.

If you can see here, I’m cutting rounded inward grooves into the girdle (the side of the stone which separates the top from the bottom of the stone).


I got the rounded areas done. This is that time in this process where you really start to get excited by the way it’s starting to take shape.


The next step for this rose de france amethyst is to start cutting some facets into it.

I’m touching up the rounded sections on the girdle.

I added a regular table to the top of the amethyst but I wasn’t too pleased with the outcome so I decided to go with a double-sided checkerboard rosecut to the stone.

I love the ‘trial and error’ process. I’m honestly satisfied with the final product.


Why put the inward, rounded grooves into the stone you ask? I don’t know, maybe I can build something with bezels that snuggle perfectly into those grooves or have some sort of prong or build some weird bezel? Who knows, it all comes down to your artistic innovation – when that designer in you comes out to play.
Till next time…
Fried Chicken and Gems
October 24, 2011
Fried Chicken? Really? Once I saw this picture, I had to share my thoughts on it. Some of you may or may not know who Nicki Minaj is but for those who don’t know who she is, she is a pretty big recording artist. I don’t want to call this a rant but more of a funny mention to what she was sporting around her neck recently. Just have a look at the image below.

I don’t know what to say. If someone asked me to make them a special order of some fried chicken necklace, of course I’d be happy to make it, but this is just too funny. This necklace is perfect for the trending topic of #hoodmemories on Twitter as I type this. Over the top? Yeah, it is. Fits her character? Of course it does. In the end, I’m not going to sit here and judge someone on what he or she decides to flash in public and I always go by the saying, ‘whatever makes you happy’. Moving on…
I’m stuck and honored with the duties of trying to figure out what kind of center stone I can put into this white gold ring I made for a customer of mine. All they said is ‘something yellow’ in a cushion cut with a certain budget they want to stick by. I was thinking of something like a yellow ceylon sapphire or a yellow tourmaline. Any suggestions? This is the part where you help me decide with your suggestions.


It’s a beautiful and elegant looking ring that deserves something nice in the middle. One of the perks of being a gem cutter dealing with special orders is that I have the power to cut any shape and size to my needs and nothing holds me back when dealing with jewelry related problems like this one.
I have this obsession with showing off Tanzanites in my blogs for some strange reason. Well here’s another one for you viewing.

This 20 carat plus monster of a stone needs more life to it. No disrespect to all the hard workers over seas but most of the stuff I see cut from Asia and India is way below par. They are told to cut to preserve the weight while sacrificing the quality of the cutting job. I’m a big advocate of USA made products when it comes to the jewelry world. This topic is a perfect intro to the following images you’re about to see.

I don’t know if you can tell from the image but this is a parcel my customer received from their factory in Thailand and my first glance at these multicolored sapphires, I thought to myself, ‘were they drunk when cutting this?’

The cutting is awful, the person who maps out from where to cut the sapphires from the original rough, should be fired. These sapphires are filled with inclusions that leaves a bad taste in your mouth.


It’s my responsibility to re-cut and salvage these sapphires so that they can be presentable and can easily move rather then collect dust in some parcel bag in some stone dealers safe.
Next week, i’ll be showing you a detailed look at this special new cut I’ve been cutting. Till next time…
3-1 kind of a weekend
October 4, 2011
I’m going to make this a short one and not a 1000 word blog. 3-1 kind of weekend? It’s a play on words title I chose. It’s referencing my beloved San Francisco 49ers record into a young season. Niner fans have been suffering for about 10 years and milking it ‘while it lasts’ is one thing that I will be doing. I’m also going to share with my readers 3 various jobs that I’ve done. Hell, I’ll just include a YouTube video showing you a process of this coral job I did.
So I get this order for this red coral job that I needed to supply into a tear drop shape with grooves cut into them. You may remember a blog I wrote on this Turquoise job I did called ‘Turquoise Grooves‘ which explained the whole process.

I mapped out how and where I’d like my grooves to be cut on this calcium induced piece of red coral using a small disk drill bit.

As you can see, this is the process of mapping out lines into the tear drop coral.
Here’s that video I promised showing you the process.

You may notice that I cut the lines deep so I have room to make the grooves.


Here’s the finished product. I filed the grooves in and used various custom made drill bits to give it that rounded look between each groove.


I finished it off with a 1mm hole so that some sort of post would sit into the drilled area.
So I get this David Yurman two toned ring in that needed a new Moonstone cut into it.

I supplied a nice cushion cut cabochon Moonstone to sit into the bezel.

The stone should sit perfectly inside and I recommended to my customer to glue it in and to do a light hammer on the walls of the bezel to give it that extra secure fit into the mounting.

And finally, I machine cut, to the millimeter, diamond shape cut blue sapphires that I supplied into this white gold ring.

As you can see, they go from large, medium, to small.


The blue sapphires sit perfectly into the desired area and some how, I kept this blog from reaching 400 words which is a new record for me. Hopefully, I’ll have another blog out and running by the end of this Friday. Till next time…
The Tanzanite Massacre of Beauty
October 3, 2011
I feel like I start off every blog by apologizing for not posting my once a week post. I’ve been so busy (knock on wood) that I’ve fallen behind. This doesn’t mean that I haven’t been working on my blog. A lot goes into preping my blogs. I’ve developed a system I go by that involves showing you step by step photos of the labor process that goes in to my work. I usually take about 20-30 photos with my HTC EVO. Funny enough it’s from my camera phone but the technology on cellphones have come a long way and they rival any standard digital camera out there. I then transfer all the photos on to my computer and touch up the resolution of photos on Adobe Photoshop. It’s a process and a half but it’s worth it if I’m getting my point across to my readers. In order to deliver the goods, you have to keep the high standards and keep improving on each blog post.
Now, on to the business end of my blog. So I get these two matching pair, 14mm round Tanzanites the other day from a customer of mine that wanted to have it cut into a special fancy cut. If you want a nice and easy breakdown on Tanzanites, please click on the link ‘here‘ from a previous blog post I wrote a while back. Other then that, take a look at these beauties of a Tanzanite.


For people who don’t realize how hard it is to match certain stones, let alone to find 14mm round matching Tanzanites, in this quality, just do me a favor and appreciate the rarity of these images and good luck finding two matching stones like these in this size.

These images don’t do any justice to stones like this so I took a bunch of pictures to show off that nice blue with a hint of purple color these beauties give out.


The last two photos is a shot of the pavillion. What the customer wanted me to do is cut these Tanzanites into a domed, almost ball-like shape, matching 11mm pairs. This is where the title of my latest post comes into play. Tanzanites are expensive and when I’m asked to cut them into some fancy domed cut, the stone is going to lose a lot of weight. It’s called a massacre in my book, hence the title but the outcome is beautiful. If you’re still lost, continue looking at the next photos and you’ll see the process unfold and you’ll get what I’m talking about.

I glued the Tanzanite upside down on the dope stick in order to get the domed look because the pavillion is where all the weight is held.

The first thing I did was to cut the size needed so it can fit into the custom earring being made for the Tanzanites. I trimmed it down to 11mm from the original 14mm. As you can see, I now have space to pre-form the stone into a domed shape before I start cutting in the facets.

So I rounded out the Tanzanites with a the biggest dome I can get out of the stones and added the facets. It’s sort of free form but it resembles a Portuguese cut.


This is the polished and finished product. They don’t look like they don’t match but I promise it’s from the picture.

You’ll see a series of photos from different angles so you can get the complete show of these beauties.

The thing with Tanzanite, for example is that 85% of the stones you get look like a 5carat stone from the top/table but when you put it on a scale it reads 9 carats. The high concentration of mass is sitting in the butt (pavillion) of the stone and as a result emits a killer blue-purple color.

Cutting the Tanaznite bottom heavy, retains the color in most cases. My customer was aiming for a ball shape and was hoping to retain most of the original color from before I cut into them. He lost about 10% of the color but nowhere else in the world do these Tanzanites get cut like this.

What was the top of the stone, the table has now been demoted to the bottom of the stone.

I used a little flash to bring out that killer color I’ve been raving about. Imagine these matching pairs in natural day light and how much attention it’ll attract for it’s owner.


Now I thought this was the finished product and my customer was happy with it but when he started to make his earrings, he wanted the girdle area more rounded and faceted. This is why this blog has been lagging.

So I rounded out the girdle and continued the facet patterns.

The original size was a size 14mm and in order to get that dome for the Tanzanites to sit in the setting, I cut it down to the biggest size possible, which was an 11mm and rounding out the girdle, the millimeter size dropped to a 10.8mm.


On a final note, projects like this excite me and always keeps me on my toes. It’s out of the ordinary jobs like this which makes what I do different form the same daily grind the most people go through. I’ve been working on this onyx piece that just keeps breaking on me where I have to carve into it and inlay this shield emblem. Yes I cursed when it broke but in the end, it’s a trial and error process which helps develop new tools and techniques that can be utilized for future projects. It’s a learning experience and I am always willing to learn something new. Hopefully by Monday, I’ll have another short blog up with few things I’ve been working on. Till next time…
Ten years later…
September 13, 2011
This is probably the toughest blog I’ve written since I’ve started exploiting my world of gem cutting and inlay lapidary. I wanted to start off by saying this. You never know how much you love someone until they are not around anymore. 2 weeks ago, I lost my grandfather. We are all tired of the same cliches but he was an amazing man. He lived life to the fullest, had 10 kids, experienced everything life had to offer. He was 92. You’ll always have a place in my heart.
Ten years on and it’s still a daunting memory in the back of my head. I was lying in bed sick to my stomach when my mother comes into my room and tells me that a plane just hit the World Trade Center. I honestly didn’t comprehend it and went back to sleep. Ten minutes passed and I woke up again. I turned on my TV and all I see is a building up in smokes. I switch to the next channel and it’s the same thing. I then see another plane hit the other tower. I honestly thought I was watching a movie. My jaw dropped in a shock of awe. Was this really happening? I just graduated high school that past summer and I officially started working at my fathers company and it hit me: If this is happening in New York, could this happenin Los Angeles as well??? I jump out of bed and ran straight to my mother and she was on the phone. I waited impatiently waiting to ask her “what’s going on with dad?” She was on the phone with my father and he was on his way home.
9/11 is a very sensitive subject and ten years since I’ve seen this Jewelry industry take a dive like no other. Manufacturing that was done in the USA was moved overseas to deal with economic downturn. People that came into this business 15 years ago have been flushed out. I was talking to one of my customers yesterday and he was frustrated that the old age of knowledge was not there anymore. The new generation wasn’t getting involved to keep this craft going.
I was speaking to another customer of mine who called me and asked me if I was driving (speaker phone of course) and I was like “yes, I have to drive to deliver jobs. It’s a service I have to provide to keep some of my customers happy.” I’ve flown to San Francisco to drop off a job outside of the gate, then hopped onto another plane 15min later and flew back to Los Angeles. Work used to come to my doorsteps but now I chase after it. I mean, it’s all for the better right? I’m always trying to stay on top of my game and this is why I started exploiting my work while trying to educate people. My father, being old school, thinks that people would get offended by me using the word ‘educate’ when I write my blogs. I’m not trying to offend anyone but if it’s put out there for people to learn something new, then why not? The National Jeweler had an interesting piece about jewelers reflecting on 9/11. If you’re interested in reading it, click on the link ‘here‘. My prayers are with those who lost their lives to protect this great country.
Onto the business end of my blog which contains a few things I’ve been working on.
For those that haven’t read my ‘Turquoise Grooves’ blog, I received another job similar to the grooved, oval shaped turquoise with a high cabochon.

(here’s the original matching pairs I just mentioned)
I needed to cut out of rough some salmon color red corals, matching pairs. I gave a detailed breakdown in my turquoise groove blog so click on the ‘link‘ and have yourself a look.

I love the color on these corals. They came out great and that high domed look just makes the stones for me personally.
I’ve also been working on this special order involving 2mm princess cut yellow sapphires. For those who haven’t sorted through a parcel of color stones, your eyes start playing tricks on you when you are trying to match a color.


For those who were wondering, I oil emeralds. Oiling is one of the oldest treatment in the world. Oiling improves the clarity of the emerald. I received a job like this that needed a light polish on top with oil treatment after on a cut cornered, step cut emerald.

I had my setter remove it from the setting of this diamond filled ring.

I polished the stone and oiled it. I don’t know if you can tell, with the image but with the naked eye you can tell right away at the enhanced clarity of the stone.

I used a little flash to show off that beautiful green color this emerald gives out.

I had my setter set the emerald back into the mounting. This ring has such a mature and classy feel to it.
For my next job I received this ring that needed 3 rows of thin onyx, inlaid, replacing the cracked and broken original onyxes in the yellow gold ring.

I removed the old onyx and inlaid 3 new pieces of each row. With jobs like this, you need to be patient and have a light touch or you’re starting this job over.

Here’s a front view of the ring. What makes this job even more difficult is that it sits above the setting and it’s rounded surface gives it that more expensive look.
Hopefully by Friday, I’ll have another blog up on this crazy Tanzanite project I’ve been working on. The weight loss that these two beauties went through just for a fancy cut was ridiculous.

14mm matching round Tanzanites.
Till next time…
A quick round up…
August 23, 2011
What a weekend I had. On Saturday I was at a wedding that wasn’t Kim Kardashian’s, but had some Armenian involvement. Sunday night involved me driving to LAX to go pickup my brother and bandmates from their European adventures rockin out to a bunch of Swedes at the Malmo Festival. My brother is a mirco-bio major and still has time to tour the world with his band ‘Viza‘. Afterwards, I got home at 3am and hit the sack. I didn’t end up making work the next day but it’s okay since I haven’t had a vacation in almost 4 years. But I did feel guilty for missing work. So I ended up writing a blog to make up for the guilt.
As a quick side note – gold? Forget about it. It hit 1900 for a sec and it closed out below that dreaded 1900 mark. Shocking.
Anyways, Last week I took some photos of some jobs that came in. I received this 18k white gold, antique ring that needed some matching color sapphires supplied and cut into them. The stones needed to be cut in an non-typical style which was no problem. I specialize in precision cutting – I cut stones to the millimeter, usually non-standard cuts.

Here’s a top view shot of this antique ring. The diamond bezel is surrounded with tapered baguette sapphires.

Notice the side of the shank were the sapphires are missing.

You won’t find anything out there that will fit into that area without special, custom cutting.


I supplied and cut 3pcs of tapered sapphires to complete the rounded curvature of the ring.

The sapphires sit perfectly in the open space. Just get yourself an experienced setter that does great milgrain work *ahem* and make sure they don’t break the sapphires or it’s coming back to me – which I wont mind.
For my next job, I got this $1000+ a carat opal in that needed a good polish in order to bring out the beauty it radiates.

My cellphone couldn’t pick up that crazy purple hue this opal was giving.

You can barely see the purple hue on the outer rim of the opal but I promise it’s there. I’ve rarely seen something like this so i figured I had to share it.
Finally, I just wanted to give a little insight into the current Jewelery market and what I’ve been doing to stay relevant. The recent increase in overseas jewelery production has created a new competitive market which favors big factories and stamps out the smaller guy. In order to survive in this cutthroat environment you need to have something which can stand against big business. So, I’ve been producing these “Shamballa” bracelets for quite a while now. I make them to order and so far whatever I’ve made, I’ve sold off. Here’s one I’ve made for myself featuring 2 skulls with diamonds set in the forehead region.

I used silver colored rope and onyx beads with a matte finish. I had some 3.5mm burma ruby rounds I wanted to set into the eye sockets of the skull but I think I’m going to go with some 3.5mm black diamond rounds. Still deciding, but you guys can always give me some input on what you think would look better.
I usually wear these when I go out and about. If someone takes a liking to it, I show it off and give them a sales pitch. They usually put in an order or sometimes they even buy it right off my wrist! Talk about covering a bar tab.
Hopefully by Friday I’ll release another blog with this new cut I’ve been working on. Till next time…
Turquoise Grooves
July 29, 2011
I’ve been slacking once again with my blog entries. I do apologize, but I have a good one in store for you today – Turquoise. If you come to my office, you’re bound to find turquoise rough just hanging around somewhere. I actually just stopped typing to take a peek into my workshop to catch a glimpse of a turquoise rough just hanging next to the window. So, before I describe my most recent endeavor, let me share some information about turquoise.
Turquoise is an opaque stone, which means it is not see-through. It has a hardness of just under 6 on the Mohs scale. Turquoise is found in or near copper deposits/mines as it depends on the presence of copper ions for it to form. It is composed of a hydrous hydrate of copper, aluminum and phosphorus elements. Turquoise was one of the first gem stones to be mined. It comes from all over the world (Afghanistan, Africa, Australia, Brazil, Chile, China, Egypt, Iran, Israel, Mexico, Siberia, Tibetan, Turkey and the US of A). The particular turquoise I am working on comes from a unique mine located in Arizona. The western state is home to some of the largest mines in the world including the ‘Sleeping Beauty’ mine where my stone originates. Sleeping Beauty turquoise is a solid stone with no matrix that ranges in color from Royal Blue to a very light Sky Blue. Generally speaking, turquoise color ranges from green to greenish-blue to blue.
And what better way to finish off this little digression on turquoise with these interesting facts! Did you know that no English gentleman of the 17th century was not regarded as well dressed or well adorned unless he wore jewelry of turquoise? This stone was so highly valued that all 79 of the emeralds in the crown that Napoleon gave his consort Marie Louise were replaced with Persian turquoise cabochons. In my opinion, I prefer sleeping beauty turquoise for its color, quality, and the nice value it carries. I personally think it’s better than the Persian stuff. Again, that is my opinion.
I made a special order ring about a year ago with diamonds around the mounting and I supplied it with a high cab sleeping beauty turquoise with grooves that I carved into it. I would of blogged about it but I didn’t have a blog at the time. But now I do!
My customer has asked me to cut 2 matching oval shaped sleeping beauty turquoise with the same carved grooves for some earrings that she wants to make.

Here’s the top view of the Carved Sleeping Beauty Turquoise I supplied and cut.

Here’s a side view. Notice the classy look on the ring, yet the Turquoise is still the center of attention.

So I go pull out some Sleeping Beauty Turquoise rough.

Here’s another angle. I’ll be slicing through this to get the deserved size I want before I preform the turquoise.

I quickly preformed the 2 pieces of turquoise I need with a flat bottom by hand after I sliced it from its rough form.

Here’s another angle. Notice how high the dome is. It gives me room to carve into the turquoise and give it its groove without sacrificing too much of the height of the stone.

I glued the turquoise onto the dopping stick as a guide so I can start going into detail with the desired size. I’m using a millimeter gauge to measure the 16x12mm size I need. If you don’t know what a dopping stick is, click this link ‘here‘, which should take you to one of my first blogs explaining the steps into the gem cutting world.

you have to apply the softest touches to the disk or it’ll eat away at your turquoise.

I ended up with 2 matching color, cut, and shaped beauties (no pun intended) after I used the preforming machine.

Here’s a side view of the matching turquoise cabochons on the dopping sticks.

I removed it off the wax/glue and I started to pencil in the areas where I’d be carving in the grooves.

Here’s a better look. What’d did you expect? A pencil is an awesome tool sometimes.

I just started filing in the grooves. Sorry, my bench light is ruining the picture but you get the idea.

I’m using my filer to cut into the turquoise. By doing it by hand, you have more freedom in your movement.

I’m working the edges on the turquoise here.

I finished using the hand file. It sort of looks like a preformed state after I filed it.


I started using a specially designed drill bit with a round disk with an inward curvature to round out the grooves.

I took it to my lapidary machine and gave it a little nice polish on top to get these 2 beauties.


Matching cut pairs.

That was a fun and challenging project. Next week I’ll start putting some of my special orders I get that involve some sort of gem cutting + whatever I make for the gemstone. Till next time…
Candy Wrapped
July 15, 2011
I’ve been lagging as of late from my last post so I do apologize. But behind the scenes I’ve been compiling a list of projects I can blog about so I can bang them out on a weekly basis. On that note, I had a friend drop by my office the other day with a crazy idea. She wanted me to supply a pearl that has been unwrapped and make a silver ring out of it. I was like ‘what the hell are you talking about???’ So she goes into her purse and pulls out this drawing of her idea.

After looking at this picture for like a minute with the biggest puzzled look on my face, I asked her to explain herself. She told me she wanted a pearl ‘candy wrapped’. Still didn’t make sense. I said, ‘paint the picture for me’. She went on to tell me that ‘you know how when you open an oyster up and a pearl sits in the middle? Well, what if you can unwrap a candy wrapper and it presents to you a pearl like an oyster does?’ Really, hippie woman? I asked her to draw it for me right there on the spot. Picasso would love this abstract piece of art.

After looking at this, I told her that I’ll work on something. I get the concept but to put it into 3 dimensions without making it look bad was the part that I was having a hard time with. I pulled out an oval shaped pearl, went downstairs to the liquor store and bought myself a butterscotch candy. I unwrapped it, removed the candy from the wrapper, and sent it straight into my mouth. I put the pearl into the candy wrapper and twisted it shut. The unveiling I was about to perform was about to put the picture into reality. I unwrapped the candy wrapper and that pearl looked right back at me. I’ve finally figured out how to CAD design this ring and complete it.

It looks cool right? This is a top view of the pearl ring.

I gave it a split shank look with a stem like support on the edge of the wrappers.

Here’s the silver/white gold look. Night and day difference from the my friends drawing.

Here you got the yellow, white and rose gold looks.
I sent the CAD file to my solid scape machine and started to grow the wax. Are you wondering how the pearl is going to sit? I’m glad you asked as always. I drilled two holes where pins on both sides of the mounting holds the pearl in. After wax is done growing, I send it for silver casting. I receive it back from casting and set the stone polish and finish the ring. I present to you the ‘Candy Wrapped Pearl”…

Here’s a top view. My cellphone camera takes better pictures then my 8 year old camera. Horrible, I know.

Here’s a more clear image from a top view. It looks great!

Here’s another angle.

Here’s another side view shot of the ‘Candy wrapper pearl’ ring.

Here’s the bottom of the ring. Keep in mind my friend was on a budget and wanted something simple and this came out to be on budget and for everyday use. It’s an awesome ring for any outing.

I delivered the ring to my friend and she absolutely loved the way it came out. Unfortunately, I couldn’t take a picture of the excitement on her face.

But she did allow me to take a photo of her hand with the ring on it.

Keep in mind, me being a gem cutter, I can cut you any stone to fit into the candy wrapped design. Whether it be rose cut all around a black onyx or some nice dark Amethyst from Uruguay. Name it and I can sculpt away. Yes, I do special orders if you haven’t noticed. I’ll be featuring some more later on.
Next week, I’ll be featuring some crazy Turquoise carving I did for a customer of mine. Till next time…
Actually, I wanted to give a nice shout out to the US Women’s National team because what they pulled off in the 122min into extra time against Brazil was something out of Hollywood. I was in awe. Good luck to them as they try to capture a 3rd World Cup against Japan. Ok, now I’m done. Cheers!
